


Optimizing Open-Source Model Hosting with LLM Engine

In July 2023 we announced the launch of LLM Engine, our open-source platform for customizing and serving large language models (LLMs). We decided to open-source this platform to give all enterprises the opportunity to accelerate their ability to host and fine-tune LLMs.
For customers with larger-scale hosting needs and more powerful fine-tuning features, we also built an advanced version of LLM Engine that is available on Scale GenAI Platform. Through deploying customized LLMs for customers we have found that the details of hosting LLMs are still obscure, so we wanted to shine a light on how this works and how LLM Engine is architected to optimize each step of the process.
And we are excited to announce that coming soon, Scale GenAI Platform customers can leverage Nvidia NIM microservices through LLM Engine for optimized LLM inference. Nvidia NIM microservices provide flexibility and performance for running customized generative AI in production.
In general, deploying LLMs to the cloud is an expensive operation that requires experience in both cloud infrastructure and machine learning. While great technologies exist for general service orchestration (e.g kubernetes), there are some distinct frictions with serving deep-learning workloads:
-
Effective GPU utilization - It is well known in the industry that there is a fierce GPU supply crunch. Squeezing as many queries per second (QPS) as possible out of your GPU is essential for managing hosting costs for models.
-
MLE-friendly APIs - Given the incredible rate of ML advancement, ML engineers/researchers should focus on ML models. We do not want to waste precious engineering cycles on scaling models to a high QP and large-scale cloud environment. These activities should be built into a platform and easily automated with minimal effort from ML engineers.
-
Experimentation speed - In most eng orgs, teams typically only maintain a few services that serve business functions from their team. In ML orgs, a single ML engineer often rapidly deploys several models as they experiment or as they deliver models from project to project. An ML Engineer's (MLE's) overall productivity should not slow down, even when the number of endpoints they manage grows.
-
Efficient auto-scaling - While QPS is a good metric for individual GPU nodes, ML teams and production applications also need the number of GPU nodes serving a model to autoscale up and down efficiently as demand fluctuates. Because of the lack of availability and cost of GPU nodes, it is also necessary to autoscale down to zero to avoid a very high minimum cost when experimenting with a large number of models.
- Data privacy concerns - While many commercial models are only available via API endpoints, when possible, we wanted to host OSS models on our own infrastructure to eliminate any privacy concerns related to sending our internal proprietary data to an external service to leverage these models.
Our team found no open-source software that satisfied all these needs. Given that ML is a core competency within Scale, we did not want to lock ourselves into proprietary solutions that could not be customized.
We built LLM Engine as an open-source platform to serve and fine-tune foundation models, whether you use Scale's hosted infrastructure or your own cloud infrastructure. The advanced version of LLM Engine powers our Scale GenAI Platform. Today, all of our internal ML models are deployed with LLM Engine.
While the current public-facing documentation for LLM Engine primarily focuses on the LLM-specific APIs, this blog will explore the lower-level APIs that our internal MLE’s leverage.
Usage Summary
We start with a quick overview of core API concepts and showcase how MLEs leverage LLM Engine to host their custom models. We encourage readers to check the API docs for full details. Note that code examples will have references to Launch, which is how we refer to LLM Engine internally.
First, users create a ModelBundle. Users can think of ModelBundles as deployable assets (code + model weights) that are capable of making “prediction” requests. Users must also specify an expected request/response schema for the bundle. Should users need complete customization, there is also an option for users to bring a full image as a RunnableBundle. Below is a simple example:
from launch import LaunchClient
from pydantic import BaseModel

class MyRequestSchema(BaseModel):
    x: int
    y: str

class MyResponseSchema(BaseModel):
    __root__: int

def my_load_predict_fn(model):
    def returns_model_of_x_plus_len_of_y(x: int, y: str) -> int:
        """MyRequestSchema -> MyResponseSchema"""
        assert isinstance(x, int) and isinstance(y, str)
        return model(x) + len(y)
    return returns_model_of_x_plus_len_of_y

def my_load_model_fn():
    def my_model(x):
        return x * 2

BUNDLE_PARAMS = {
    "model_bundle_name": "test-bundle",
    "load_predict_fn": my_load_predict_fn,
    "load_model_fn": my_load_model_fn,
    "request_schema": MyRequestSchema,
    "response_schema": MyResponseSchema
    "requirements": ["pytest==7.2.1", "numpy"],  # list your requirements here
    "pytorch_image_tag": "1.7.1-cuda11.0-cudnn8-runtime",
    # additional fields omitted
}

client = LaunchClient(api_key=os.getenv("LAUNCH_API_KEY"))
client.create_model_bundle_from_callable_v2(**BUNDLE_PARAMS)
After a ModelBundle is registered, users can now create ModelEndpoints. ModelEndpoints are actual deployments of a specified model bundle that can handle production traffic. Users specify various deployment parameters, such as min/max number of workers, as well as the compute resources such as the number of GPUs, CPUs, etc. A single model bundle can be used in several ModelEndpoints, whether they are synchronous, asynchronous, or streaming:
#  Creating an asynchronous endpoint
ENDPOINT_PARAMS = {
    "endpoint_name": "demo-endpoint",
    "model_bundle": "test-bundle",
    "cpus": 1,
    "min_workers": 0,
    "endpoint_type": "async",
}
endpoint = client.create_model_endpoint(**ENDPOINT_PARAMS)
That’s it! Once an endpoint has status READY, an MLE’s model is ready to serve production traffic. We show an example of submitting an async request:
def predict_on_endpoint(request: MyRequestSchema) -> MyResponseSchema:
    endpoint_request = EndpointRequest(args=request.dict(), return_pickled=False)
    future = endpoint.predict(request=endpoint_request)
    raw_response = future.get()
    response = MyResponseSchema.parse_raw(raw_response.result)
    return response
request = MyRequestSchema(x=5, y="hello")
response = predict_on_endpoint(request)
Open-Source LLM hosting
Leveraging the core API routes mentioned previously, LLM Engine includes specialized /llm/* APIs optimized for fine-tuning and hosting open-source LLM models. With LLM Engine, we host a model zoo of popular open-source LLMs (e.g Llama 2 or Mixtral 8x7B) that product teams can immediately leverage to build Generative AI applications. Under the hood, LLM Engine leverages open-source frameworks like vLLM to maximize tokens/sec.
from llmengine import Completion

response = Completion.create(
    model="mixtral-8x7b",
    prompt="Hello! ",
    max_new_tokens=10,
)
print(response.output.text)
Check out the public docs for usage details for LLM-focused APIs.
LLM Engine Architecture
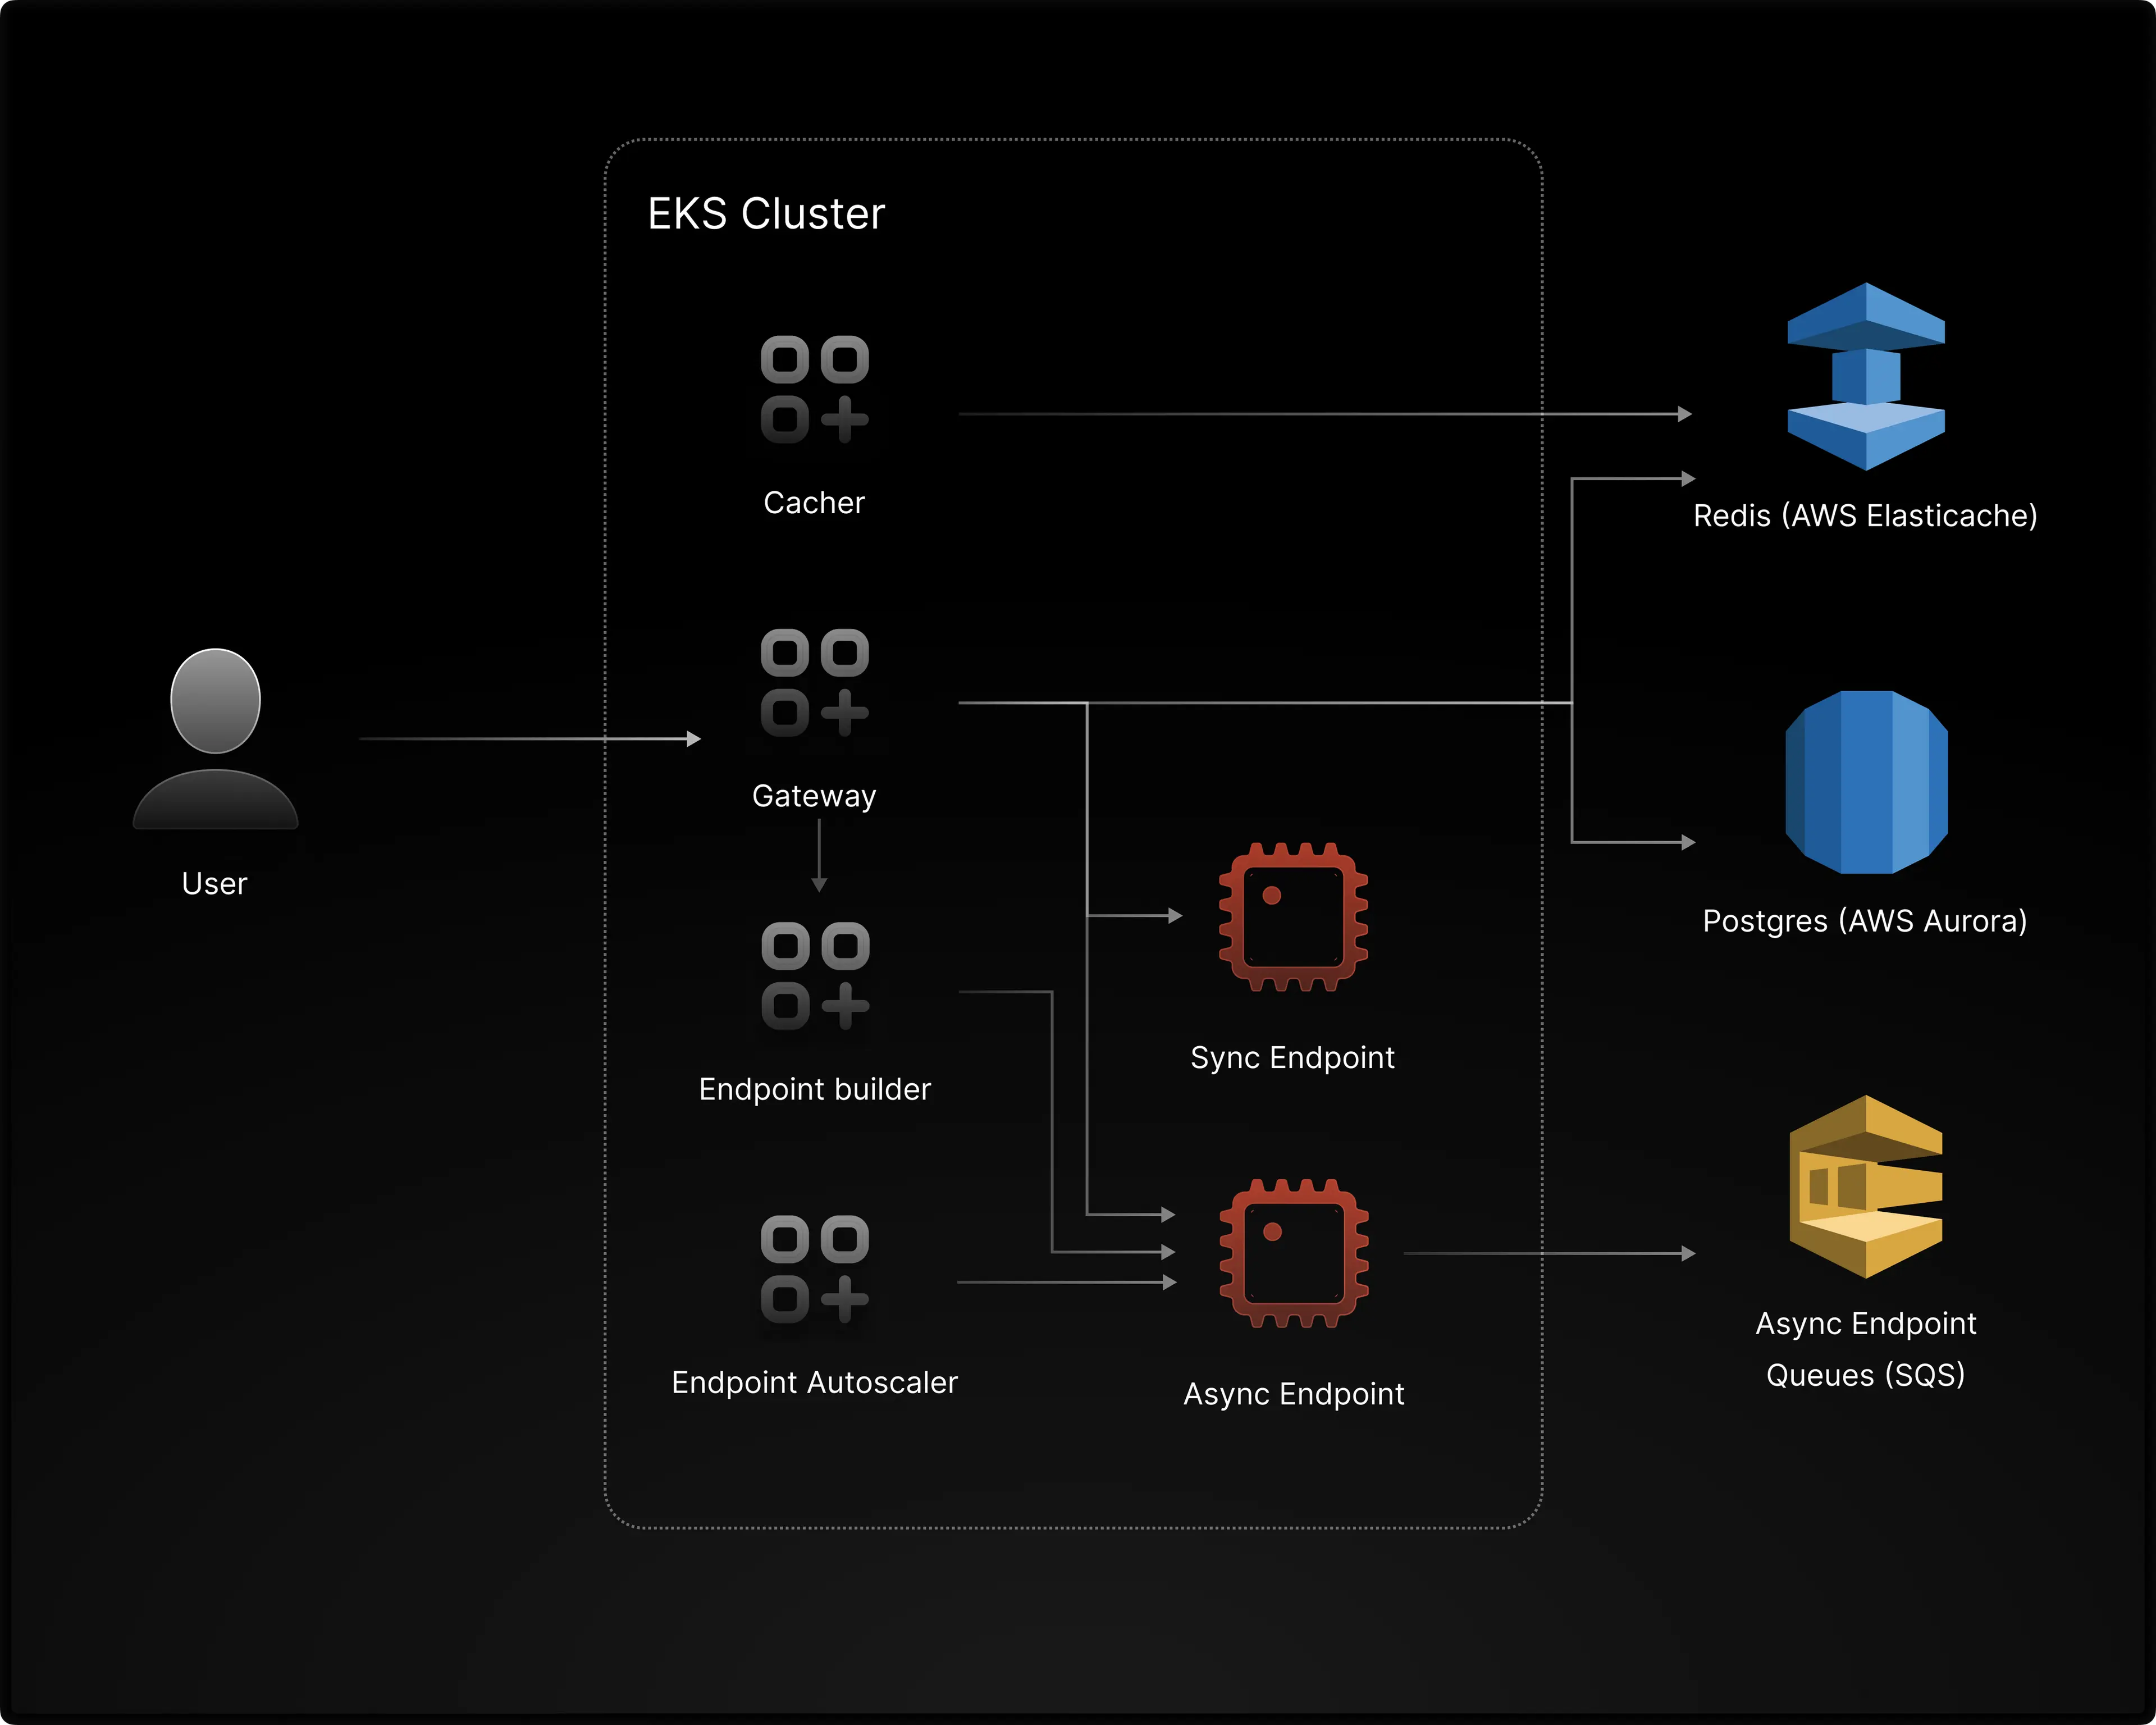
LLM Engine Gateway
The Gateway is the central API server that orchestrates all incoming user requests. All CRUD operations involving API objects such as endpoints, bundles, etc., go through the Gateway first. API object metadata is stored in a Postgres-based datastore.
Endpoint prediction requests (e.g., “Tasks”) are routed first through the Gateway. The Gateway simply routes requests to the correct endpoint for sync or streaming tasks. For async tasks, the Gateway pushes tasks to the correct queue.
Endpoint Builder
Endpoint creation can be a long-running process depending on the Bundle provided by users. Therefore, LLM Engine separated out this process from the core Gateway for improved request stability. The Endpoint Builder is implemented as a Celery worker that receives endpoint CRUD requests from a predefined queue. Endpoint creation then goes through the following steps:
-
Create an endpoint image - For Cloudpickle Bundles, the Endpoint Builder must first launch a Kaniko job to bake the Bundle into a deployable container. Future Endpoint creation requests with the same bundle do not require rebuilding. For RunnableImage Bundles, this build step is skipped.
-
Create Kubernetes Resources - The Endpoint Builder will translate user-specified requests (e.g resource_request, num_workers) to the correct k8s resources required to deploy the Endpoint. For the most part, one can think of an LLM Engine Endpoint corresponding 1:1 to a k8s Deployment. Several additional k8s resources (e.g PodDisruptionBudget, HorizontalPodAutoscaler) are also created, but we won’t go into all of them in this post.
-
(Async Endpoints Only) Create Queue - For async endpoints, an SQS queue is created to store EndpointRequests before they are consumed.
Anatomy of an Endpoint
Pictured below is a bit more detail for an individual Endpoint worker:
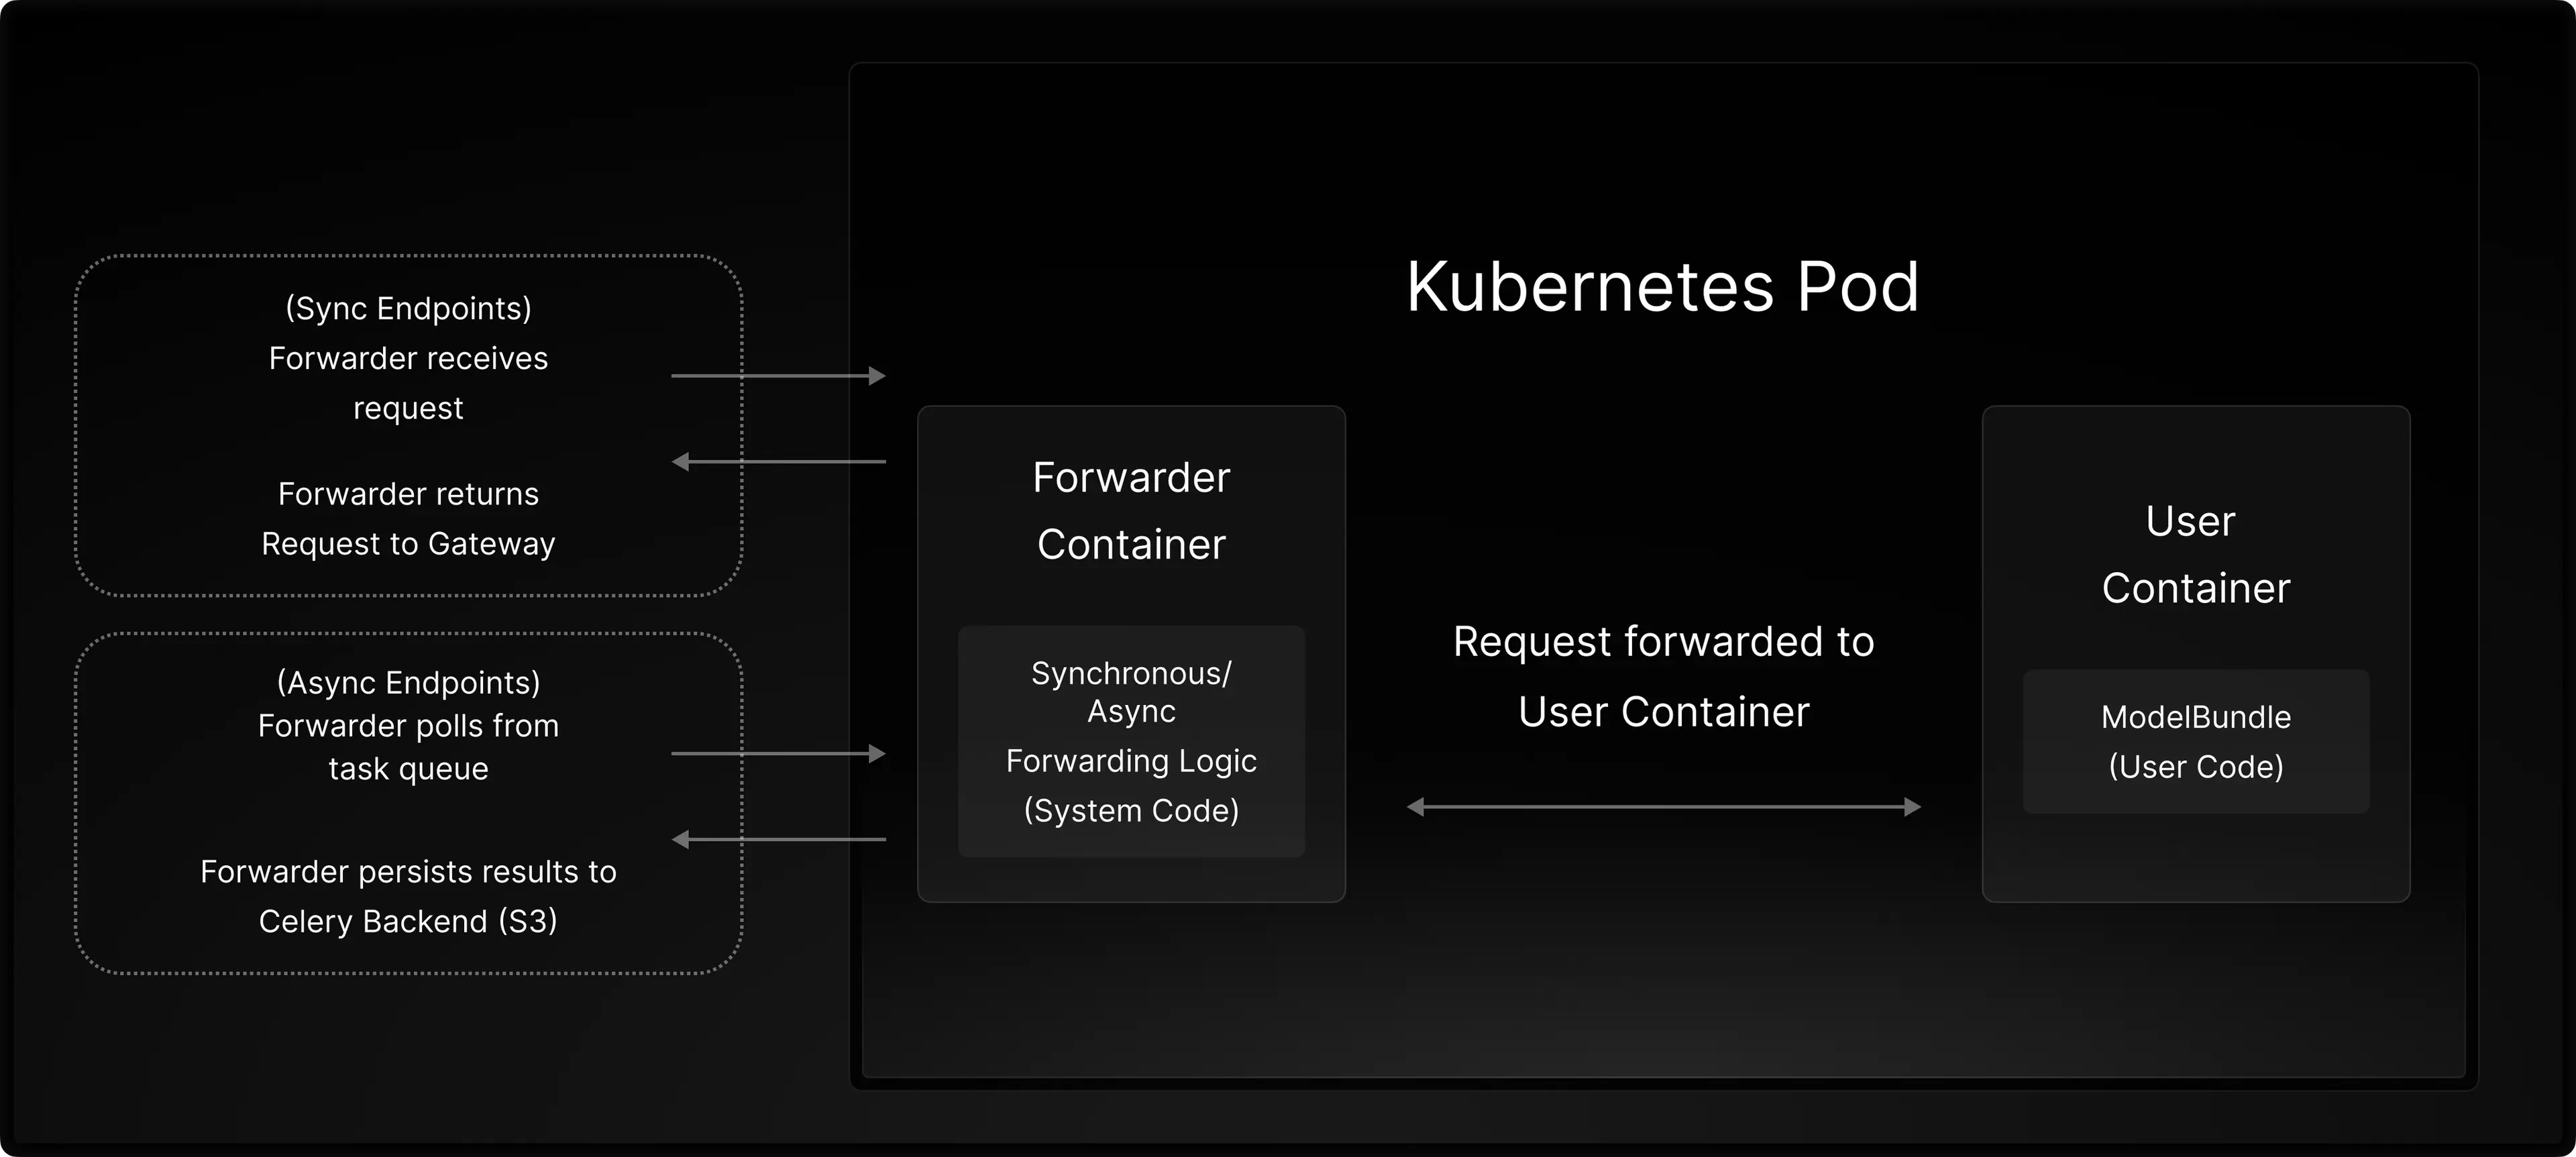
Every worker for an endpoint is deployed as a k8s pod. Within the pod, there are two containers:
-
The User Container is the image built in the previously mentioned Endpoint creation process. For Cloudpickle Bundles, LLM Engine bakes the code into a Rest Framework. For RunnableImage Bundles where users essentially provide their own image, the API contract simply requires an HTTP listener at port 5005.
-
The Forwarder Container contains LLM Engine system code required to forward requests to the User Container. For async endpoints, the forwarder handles the Celery logic to poll/forward tasks to the User Container and then persist results to a Celery Backend, which is S3 in our internal deployment. The Forwarder also emits metrics useful for Endpoint monitoring and can perform pre/post-processing hooks for incoming Predict requests.
By leveraging a separate container LLM Engine isolates system dependencies and logic from user code, enabling the same bundle to be leveraged for sync/async/streaming endpoints without any dependency conflicts or any changes in user logic. Separation also enables users to have the option of complete customization should they need to bring their own image.
Autoscaling
MLE’s can specify how to autoscale their endpoints with the requests_per_worker field. For example, a value of 2 would mean that each worker should handle about ~2 concurrent requests. Users can also specify the min_worker and max_worker they are willing to scale in order to balance costs with reliability.
Sync/Streaming
To autoscale sync/streaming endpoints, LLM Engine leverages the Prometheus Adapter to create custom metrics for Horizontal Pod Autoscalers. Specifically, LLM Engine creates a request-concurrency-average metric whose target value is equal to the user-provided requests_per_worker value. To compute this custom value, LLM Engine leverages Istio’s Request Duration Metric (e.g istio_request_duration_milliseconds) to approximate the average concurrency per endpoint.
Async
LLM Engine scales async endpoints based on the task queue length. Autoscaling based on external queues is not a standard feature in K8s, so LLM Engine contains an Autoscaler component. The Autoscaler polls queues for their lengths and then adjusts the workers for corresponding endpoints. The autoscaler simply updates the replicas field for the corresponding k8s deployments objects. The desired replicas value is calculated as the “max queue length over the last 10 minutes” divided by the user provided requests_per_worker value.
Scale From Zero
Some endpoints benefit from scaling down to 0 workers for particular use cases. An example would be experimental endpoints only used for demos or model zoo endpoints that receive very little traffic. To support scaling from zero, LLM Engine makes use of KEDA. A KEDA scaler is configured to scale on the length of a Redis list. Inside the Gateway, LLM Engine pushes items to the Redis list, but caps the length of the list at one, in addition to setting an expiration time on the list. This has the effect of enabling scaling from zero pods to one pod. The request is saved inside the Gateway so that LLM Engine can wait for the pod to scale up to serve the request.
Cacher
For the request volume LLM Engine makes to the K8s API, the K8s API server is slow and easily overwhelmed. Simple list pod operations can take over a few seconds, especially as the number of pods grows in the cluster. LLM Engine has a cacher service that periodically queries for the Kubernetes API for all relevant cluster states and saves it to Redis cache. This takes load off the core K8s API server and significantly improves latency for simple GET requests sent by users.
The same service is responsible for updating Endpoint image caches in the nodes. This enables different endpoints to autoscale much faster, enabling users to efficiently provision GPU resources for their workloads. Without fast autoscaling, users would often bump up their min_workers to a value much higher than required and consequently rack up a higher compute bill. For details about fast autoscaling, we defer to a previous blog post dedicated to this topic.
Self-Hosting
LLM Engine's self-hosting feature is compatible with AWS and Azure environments. It utilizes a Helm chart for configuring and managing the LLM Server, ensuring seamless integration within a cloud environment. Key components of this setup (visualized in our system diagram above) include dependencies like PostgreSQL for database needs and Redis for caching and queuing.
Overall, this self-hosting setup offers a robust, scalable solution for deploying LLM Engine, aligning with contemporary cloud infrastructure needs and providing a flexible, powerful environment for LLM applications.
Get started by downloading the open-source repo from Github. If you need a full-stack platform to customize, build, test, and deploy enterprise-ready Generative AI models and production applications, you can learn more about Scale GenAI Platform.
Acknowledgments
Special thanks to the Scale team that made this work possible:
Sean Shi, Yi Xu, Will Song, Yunfeng Bai, Katie Wu, Sai Atmakuri, Ian Macleod